
MuleSoft DataWeave: Tutorial, Best Practices & Examples
MuleSoft is a leading integration platform that can effectively address the rising demand for interconnecting different systems, platforms, and data within an enterprise. It creates a comprehensive solution by producing application networks through APIs, enabling organizations to connect their systems and streamline their processes efficiently to achieve enhanced productivity and agility.
This article provides a tutorial for the most common DataWeave operators and functions, including examples and code snippets. We also introduce a free AI tool that automatically generates DataWeave code, unit test cases, and documentation. By mastering these functions and following the best practices, including the strategic use of AI, we can deliver high-quality, maintainable, and scalable integration projects.
Key MuleSoft DataWeave concepts
What is DataWeave?
DataWeave is an integral part of MuleSoft that helps accelerate its data transformation and integration capabilities. DataWeave allows us to read data from various formats, such as JSON, text, CSV, and XML. As a MuleSoft developer, one must upskill one's expertise in DataWeave, which will help us create a full-fledged MuleSoft project.
Major operators used in MuleSoft DataWeave
MuleSoft DataWeave uses a rich set of operators, enabling developers to perform various data transformation tasks efficiently. Some built-in operators are essential for transforming and manipulating data. These operators, described further in this article, are designed to handle collections (arrays and objects) efficiently.
The screenshot below shows the use of the Map operator to create a mapping with the help of Dataweave Playground.

Map/mapObject operator
The Map operator is used for iterating over an input array and accessing each item and its index, which will provide us with an array response based on the transformation logic we have provided. The Map operator accepts two parameters that will help us traverse the array:
- The data found while traversing through the array
- The data index within that array
Like the Map operator, we can use the mapObject operator to work over an input payload of type objects and create an output object based on the DataWeave script. A mapObject operator will contain three parameters:
- The value of the object
- The key to the value
- The index of the value
The Map operator is used when the input is an array, whereas the mapObject operator is used when the input is an object.
Map example
Given an input array containing the student's name, roll number, and age, add a key-value pair to each student object. This new uniqueId key will have the student's name appended to the roll number, separated with a hyphen.
Input:
[
 {
   "name": "Emma",
   "rollNumber": 1,
   "age": 10
 },
 {
   "name": "Liam",
   "rollNumber": 2,
   "age": 11
 },
 {
   "name": "Olivia",
   "rollNumber": 3,
   "age": 11
 }
]
DataWeave code snippet:
%dw 2.0
output application/json
---
payload map ((student, index) ->
   {
       name: student.name,
       rollNumber: student.rollNumber,
       age: student.age,
       uniqueId: student.name ++ "-" ++ student.rollNumber
   }
   )
Output:
[
 {
   "name": "Emma",
   "rollNumber": 1,
   "age": 10,
   "uniqueId": "Emma-1"
 },
 {
   "name": "Liam",
   "rollNumber": 2,
   "age": 11,
   "uniqueId": "Liam-2"
 },
 {
   "name": "Olivia",
   "rollNumber": 3,
   "age": 11,
   "uniqueId": "Olivia-3"
 }
]
{{banner-large="/banners"}}
mapObject example
Given an input object containing the student's ID and name, add an object with index as key and key-value pair as value. This new uniqueId key will have an index that highlights each key and value given in the input.
Input:
{
   "Id":"1",
   "name":"Joe"
}
DataWeave code snippet:
%dw 2.0
output application/json
---
payload mapObject (value,key,index) -> { (index):
   {
       "key": key,
       "value": value
   }
}
Output:
{
 "0": {
   "key": "Id",
   "value": "1"
 },
 "1": {
   "key": "name",
   "value": "Joe"
 }
}
Passing parameters
In DataWeave, passing parameters to the Map operator is not mandatory. If it is not done, DataWeave will auto-assign some default parameters, as shown in the table below.
Let's take the same input example we used with the Map operator earlier and see how to use the $ and $$ parameters in the DataWeave code. We can add two new key-value pairs based on the student's age: olderThanTen and currentIndex. If the student is older than 10 years, set the olderThanTen value to True; otherwise, set it to False.
Input:
[
 {
   "name": "Emma",
   "rollNumber": 1,
   "age": 10
 },
 {
   "name": "Liam",
   "rollNumber": 2,
   "age": 11
 },
 {
   "name": "Olivia",
   "rollNumber": 3,
   "age": 11
 }
]
DataWeave code snippet:
%dw 2.0
output application/json
---
payload map()->

$ ++ {
       "olderThanTen": if($.age > 10) true else false,
       "currentIndex": $$
    }
Output
[
 {
   "name": "Emma",
   "rollNumber": 1,
   "age": 10,
   "uniqueId": "Emma-1",
   "olderThanTen": false,
   "currentIndex": 0
 },
 {
   "name": "Liam",
   "rollNumber": 2,
   "age": 11,
   "uniqueId": "Liam-2",
   "olderThanTen": true,
   "currentIndex": 1
 },
 {
   "name": "Olivia",
   "rollNumber": 3,
   "age": 11,
   "uniqueId": "Olivia-3",
   "olderThanTen": true,
   "currentIndex": 2
 }
]
Using AI tools with map/mapObject operators
The screenshot below shows how to use CurieTech AI's Dataweave Generator Agent, an AI tool for generating DWL expressions we discussed earlier in the article, to create a dataweave script with map operators. First, select the sample input format: whether we want to convert a JSON record into a JSON record, XML, etc. Next, provide valid JSON input and output in the Sample Input Data section. Also, we can pass notes in the Notes section to add specific instructions. Once we've done this, click Submit, and the system will create a DataWeave expression for us using the Map operator.

Filter/filterObject operator
The Filter operator is used to filter an array by traversing through it. We can implement some conditions within the Filter operator, and based on that filter, DataWeave will create the output response.
The Filter operator accepts two parameters. The first always contains the data while traversing the array - the condition is checked against this value. The second parameter holds the data index within that array. It can be used against any condition we have defined.
Like the Filter operator, we can also use the filterObject operator to work over an input payload of type object and filter out the key-value pair that matches the expression mentioned in the filterObject operator.
Filter example
Given an input array containing an employee's name, ID, and primary skills, filter out those with “MuleSoft” in their primary skill set.
Input:
[
 {
   "name": "Emma",
   "empId": 1,
   "skills": ["Java","Python","MuleSoft"]
 },
 {
   "name": "Liam",
   "empId": 2,
   "skills": ["Java","C","SQL"]
 },
 {
   "name": "Olivia",
   "empId": 3,
   "skills": ["RAML","MuleSoft","Munit"]
 }
]
DataWeave code snippet:
%dw 2.0
output application/json
---
payload filter ((item, index) ->
   item.skills contains "MuleSoft"
)
Output:
[
 {
   "name": "Emma",
   "empId": 1,
   "skills": ["Java", "Python", "MuleSoft"]
 },
 {
   "name": "Olivia",
   "empId": 3,
   "skills": ["RAML", "MuleSoft", "Munit"]
 }
]
Here, the skills contain various values that denote each employee's skill set. Except for Liam (empId 2), the rest of the employees have “MuleSoft” as their primary skill set.
When the Filter operator checks the condition for whether employee skills contain “MuleSoft,” only the employee at index 1 has returned a false value to the condition, so it has been filtered out from the response.
Example for filterObject
Given an input object containing an employee's ID and name, filter out the objects containing a key value of 1.
Input:
{
 "1": {
   "Id":"1",
   "name":"Joe"
},
 "2": {
   "Id":"2",
   "name":"Charles"
}
}
DataWeave code snippet:
%dw 2.0
output application/json
---
payload filterObject ((value, key, index) -> key~="1")
Output:
{
 "1": {
   "Id": "1",
   "name": "Joe"
 }
}
Using AI tools with filter/filterObject operators
The screenshot below shows how to use CurieTech AI's Dataweave Generator Agent, an AI tool for generating DWL expressions we discussed earlier in the article, to create a dataweave script with filterObject operators. First, select the sample input format: whether we want to convert a JSON record into a JSON record, XML, etc. Next, provide valid JSON input and output in the Sample Input Data section. We can also pass notes in the Notes section to add specific instructions. Once we've done this, click Submit, and the system will create a Dataweave expression for us using the filterObject operator.

Pluck operator
The Pluck operator is a handy tool for transforming an input object. In MuleSoft, there will be scenarios where a developer has to perform complex transformation logic, specifically where the input type is an object.
The Pluck operator must be used when the input is an object, and the expected output is an array. It has three parameters: value, key, and index, in that order. We will see some examples below where Pluck will be helpful.
Pluck example
Given an input object containing a customer's order details, the serialNo tag contains the batch numbers and serial values of each product the customer has purchased. In the output, we need to segregate the payload into an editorial object containing the customer details and the serial number, constructed by fetching the value under the serialNo tag.
Input:
{
 "orderId": "12345",
 "name": "John Doe",
 "email": "johndoe@example.com",
 "item": "Laptop",
 "serialNo": {
   "batch123": "1Xbr12345",
   "batch123": "1Xbr12346",
   "batch124": "1zbs12344"
 }
}
DataWeave code snippet:
%dw 2.0
output application/json
---
payload.serialNo pluck ((value, key, index) -> {
       "orderId": payload.orderId,
       "name": payload.name,
       "email": payload.email,
       "item": payload.item,
       "serialNo": value
   }
)
Output:
[
 {
   "orderId": "12345",
   "name": "John Doe",
   "email": "johndoe@example.com",
   "item": "Laptop",
   "serialNo": "1Xbr12345"
 },
 {
   "orderId": "12345",
   "name": "John Doe",
   "email": "johndoe@example.com",
   "item": "Laptop",
   "serialNo": "1Xbr12346"
 },
 {
   "orderId": "12345",
   "name": "John Doe",
   "email": "johndoe@example.com",
   "item": "Laptop",
   "serialNo": "1zbs12344"
 }
]
The scenario above is an example of a customer who purchased three laptops. The input payload contains the customer’s details and aggregated information about the laptops in the same object.
The shipping department needs all purchases separately to generate the barcodes for that serialNo efficiently. We must create an array of objects with the same customer information and 1 serial number at a time to implement this.
{{banner-large-graph="/banners"}}
Passing parameters
The table below shows the default parameters for the Pluck operator.
Using AI tools with the Pluck operator
The screenshot below shows how to use CurieTech AI's Dataweave Generator Agent, an AI tool for generating DWL expressions we discussed earlier in the article, to create a dataweave script with pluck operators. First, select the sample input format to determine whether we want to convert a JSON record into a JSON record, XML, etc. Next, provide valid JSON input and output in the Sample Input Data section. We can also pass notes in the Notes section to add specific instructions. Once we've done this, click Submit, and the system will create a DataWeave expression for us using the pluck operator.

Reduce operator
The Reduce operator aggregates or summarizes data in an array into a single value. It iterates through the elements of an array and applies a specified logic to reduce them to a single output. Reduce has two parameters: the value pointing to the current element in the array and an accumulator for storing the results. In the Reduce operator, we can initialize the accumulator with some value; otherwise, it will be initialized to the first item in the array. This operator can append strings, merge payloads, calculate mathematical expressions on arrays, etc.
Reduce example
The following example takes an array of integers as input and determines the balance remaining after subtracting the sum of the values from a starting value 100.
Input:
[10,20,30,30]
DataWeave code snippet:
%dw 2.0
output application/json
---
payload reduce ((item, accumulator=100) -> accumulator-item)
Output:
10
Here, the accumulator value is initialized to 100. Then, the Reduce operator applies the reduction Lambda expression, where each item in the array is subtracted from the accumulator. At the end of each iteration, the accumulator is updated with the value calculated from the subtraction.
Passing parameters
Passing the parameters to the Reduce operator is optional, just like the Map operator. In such cases, DataWeave will auto-assign with $ and $$ parameters.
Using AI tools with the Reduce operator
The screenshot below shows how to use CurieTech AI's Dataweave Generator Agent, an AI tool for generating DWL expressions we discussed earlier in the article, to create a dataweave script with reduce operators. First, select the sample input format to determine whether we want to convert a JSON record into a JSON record, XML, etc. Next, provide valid JSON input and output in the Sample Input Data section. We can also pass notes in the Notes section to add specific instructions. Once we've done this, click Submit, and the system will create a Dataweave expression for us using the reduce operator.

Real-time scenario
Let’s take a look at a more complex scenario involving the use of the operators described above.
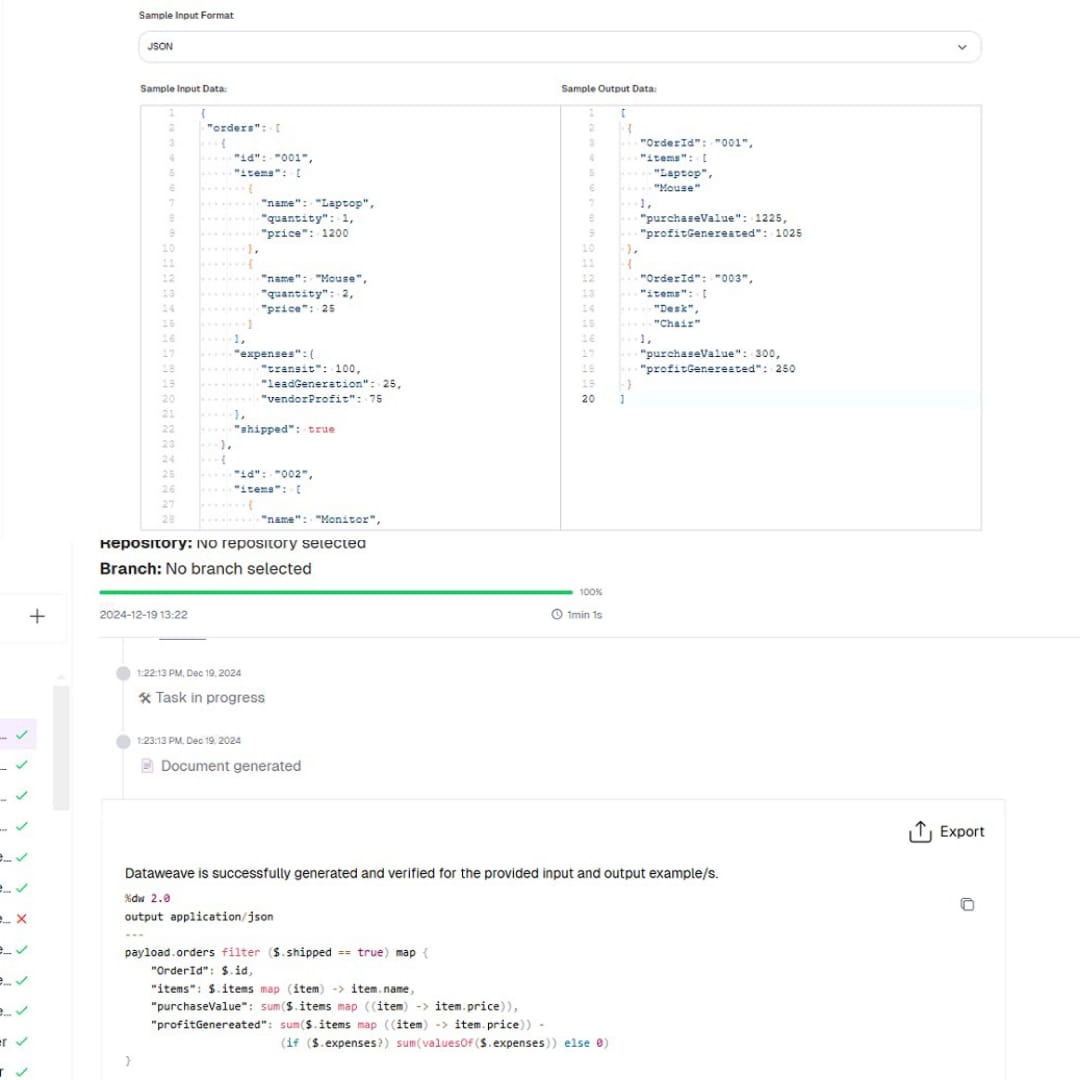
Given input data that contains an organization's order details, create DataWeave code that generates an output containing the order ID, items sold under the order ID, total purchase value of that order, and profit generated under that order, which can be calculated by subtracting expenses from total purchase value.
Input:
{
 "orders": [
   {
     "id": "001",
     "items": [
       {
         "name": "Laptop",
         "quantity": 1,
         "price": 1200
       },
       {
         "name": "Mouse",
         "quantity": 2,
         "price": 25
       }
     ],
     "expenses":{
         "transit": 100,
         "leadGeneration": 25,
         "vendorProfit": 75
     },
     "shipped": true
   },
   {
     "id": "002",
     "items": [
       {
         "name": "Monitor",
         "quantity": 2,
         "price": 300
       },
       {
         "name": "Keyboard",
         "quantity": 1,
         "price": 50
       }
     ],
     "shipped": false
   },
   {
     "id": "003",
     "items": [
       {
         "name": "Desk",
         "quantity": 1,
         "price": 200
       },
       {
         "name": "Chair",
         "quantity": 4,
         "price": 100
       }
     ],
     "expenses":{
         "transit": 20,
         "leadGeneration": 10,
         "vendorProfit": 10,
         "assemblyCost":10
     },
     "shipped": true
   }
 ]
}
DataWeave code snippet:
%dw 2.0
output application/json
---
//filtering the shipped orders using filter operator
payload.orders filter ((shipmentDetails, index) -> shipmentDetails.shipped)
   //mapping the values as output demands
   map ((order, index) ->
       {
           "OrderId": order.id,
           "items": order.items.name,
           //finding the total purchase value
           "purchaseValue": sum(order.items.price),
           //getting an array of all the expenses for the given sale using pluck operator
           "profitGenereated": order.expenses pluck ((value, key, index) -> value)
               //finding the profit by subtracting expenses from purchase value
               reduce ((expense, accumulator=sum(order.items.price)) -> accumulator-expense)
       }
   )
Output:
[
 {
   "OrderId": "001",
   "items": [
     "Laptop",
     "Mouse"
   ],
   "purchaseValue": 1225,
   "profitGenereated": 1025
 },
 {
   "OrderId": "003",
   "items": [
     "Desk",
     "Chair"
   ],
   "purchaseValue": 300,
   "profitGenereated": 250
 }
]
The following screenshot shows how to create the dataweave from this input-output sample using CurieTech AI's Dataweave Generator agent. Based on the input/output, we get the expected Dataweave expression. As mentioned earlier, we can add notes to instruct the agent in case of any specific requirement, like using built-in functions instead of hardcoded values.
Functions in DataWeave
Mulesoft DataWeave allows programmers to create functions like any other programming language. Here, a function can be defined using the keyword fun. Using the fun keyword, we must specify the function definition in the header section. The arguments to the function are specified in the function signature.
In DataWeave, we don’t have to define the data type of an argument; it will be assigned at the runtime like a variable. The function body will be written after an equals sign by following regular DataWeave syntax. Once a function has been defined in the header, we can use it in the DataWeave body.
Here, we explain how to create a user-defined function that finds a factorial of a given number.
Input:
{
 "number": 5
}
DataWeave code snippet:
%dw 2.0
fun factorial(n: Number) =
    (if(n == 0 or n == 1)
        1
    else
        n * factorial(n-1))
output application/json
---
factorial(number)
Output:
120
In the header, we have created a factorial function that will accept one argument - the number whose factorial has to be calculated. The function calculates the factorial recursively, i.e., by calling itself. First, check if the number is 0 or 1. These are the base cases; in those cases, it returns 1 as the factorial value. For other numbers, the factorial is calculated by multiplying the number by the factorial of the previous number - the latter is calculated by recursively calling the function on the previous number (number - 1).
The screenshot below shows how to use CurieTech AI's Dataweave Generator Agent, an AI tool for generating DWL expressions we discussed earlier in the article, to create a dataweave script with functions in DataWeave. We get a DataWeave expression comprising of a recursive function. The agent will use the recursive function wherever required, but if we have any specific requirement and want the DWL expression to use the recursive function, we can add the instruction in the Notes section.

Use of DataWeave Playground
DataWeave contains a large set of predefined functions and operators, which makes it suitable for working on complex data transformations. Whether we need to convert a whole input payload from one format to another or reconstruct the schema of a payload into something so different, we can accomplish it using DataWeave. These capabilities make DataWeave one of the strongest pillars in MuleSoft’s backend infrastructure.
The DataWeave Playground allows us to try sets of operators, which can then be implemented in the project. Below is a screenshot of the DataWeave Playground.

The example above converts the date format from yyyy-MM-dd to dd-MMM-yyyy.
Using the Dataweave Playground, we can also try the operators described above, such as Map, mapObject, Filter, filterObject, Pluck, and Reduce, to generate an output as required. This reduces the time and effort required to do the same locally in Anypoint Studio.

DataWeave Playground also offers suggestions on what operators can be used, a feature not available in Anypoint Studio.
DataWeave best practices
Here are some best practices to follow with DataWeave.
Avoid default parameters
Creating operators with default parameters often complicates understanding the code or reduces the overall readability of the DataWeave snippet. Therefore, following best practices while writing the DataWeave code is highly recommended, such as providing appropriate indentations and using the appropriate naming conventions for parameters.
Use “indent=false” in JSON data
While working with JSON data as a payload, it is highly recommended that the indentation be turned off if that data is not published. This can save extra space and reduce the overall size of the payload. Keep the indentation only if the payload's readability matters. We can use the keyword indent to turn off the indentation.
Input:
{
   "message": "Hello world!"
}
DataWeave code snippet:
%dw 2.0
output application/json
indent=false
---
payload
Output:
{"message": "Hello world!"}
Use operators in the right places
Using operators in DataWeave makes our code cleaner, simpler, and easier to understand. They allow us to combine data, filter, or map values without writing extra logic. For example, using ++ to merge objects or -> for transformations keeps our code concise and readable. Using the right operators, we can make our scripts more efficient and maintainable while clearly expressing our intent.
Make use of predefined functions
Using predefined functions in DataWeave is helpful because they save time and make our work more efficient. Instead of writing custom logic for everyday tasks like formatting strings, performing calculations, or handling data transformations, we can use functions built and tested by MuleSoft. This reduces the chances of errors and keeps our code clean and easy to understand. Predefined functions help improve performance and ensure consistency across our projects, making collaboration easier for teams. In short, they are like ready-made tools that simplify our work and let us focus on solving more complex problems.
Consider using DataWeave Playground
We can use DataWeave Playground to practice DataWeave coding online. This can help us understand how the data transforms in real time whenever we change the code. It can also save time by avoiding running the same transformation in Anypoint Studio, which requires creating a new application, deploying it, etc.
Use AI to work smarter and faster while avoiding mistakes
One way to streamline the creation of efficient and maintainable integrations is by using AI-driven tools, such as CurieTech AI's suite of coding, documentation, and testing agents, which builds DataWeave transformations with the help of input/output examples, mapping tables, and repo code. These agents also generate documentation and create test cases based on the prompt provided. These tools ensure high accuracy in the generated transformation logic, which is crucial for reducing errors and maintaining consistency in complex integrations. Also, these agents help us align our code with regulatory standards and best practices, ensuring that our code is efficient but also secure, and compliant.
By integrating AI solutions into the development process, developers can follow best practices easily while improving productivity and quality in their MuleSoft DataWeave implementations. This tool can also help generate unit test cases and documentation to make developers more productive.
Limitations of DataWeave
DataWeave is one of the strongest pillars in the MuleSoft platform but has some limitations:
- Memory consumption: DataWeave scripts can consume large amounts of memory, especially when processing large datasets. This can lead to performance degradation or even out-of-memory errors. It is advisable to use DWL efficiently to avoid such issues.
- Syntax and semantics: DataWeave follows a particular syntax when writing scripts, which can be challenging for a new language user.
- No state memory: DataWeave doesn’t remember past executions; it starts fresh each time we run it. We can’t keep track of cumulative changes over multiple runs.
- Dependency on Mule runtime: DataWeave relies on the MuleSoft runtime environment, so it’s not a standalone scripting language. In recent years, there have been significant upgrades to the Mule runtimes, and using the compatible version of DateWeave can sometimes be tricky.
- No external libraries imported: Dataweave scripts cannot import third-party libraries. Instead of importing a predefined function in an external library, we must implement lengthy route answers when implementing complex transformations.
{{banner-large-table="/banners"}}
Conclusion
Over the last few decades, MuleSoft has emerged as a frontrunner in the integration space, with DataWeave playing a significant role in its success. Various versions of Mule runtimes and an extensive set of native built-in MuleSoft connectors have facilitated building integrations faster. However, these advancements also introduced complexities, such as changes in architectural patterns and DataWeave syntaxes. Developers can now easily overcome these challenges by leveraging modern and free AI tools.